Philodendron Paraiso Verde, with its stunning variegated foliage, is a popular choice among plant enthusiasts. However, seeing those vibrant hues fade can be distressing. If your Philodendron Paraiso Verde is losing its variegation, one common culprit could be a spider mite infestation. In this article, we'll delve into the details of why these tiny pests could be wreaking havoc on your plant and how to address the issue effectively.
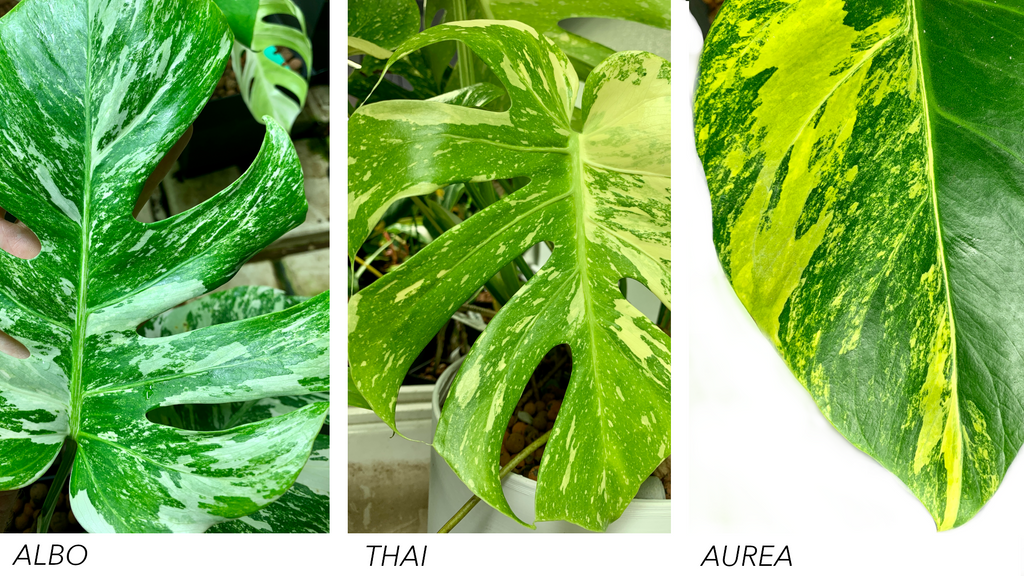
Understanding Variegation Loss: Variegation refers to the pattern of color variation in plant leaves. In the case of Philodendron Paraiso Verde, the variegation adds to its aesthetic appeal, making it a sought-after plant for indoor gardens. However, when this variegation begins to fade or disappear altogether, it's essential to investigate the underlying cause.
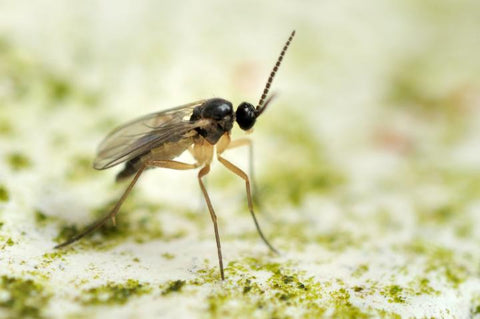
Spider Mite Infestation: The Silent Menace: Spider mites are minuscule pests that belong to the arachnid family. Despite their small size, they can cause significant damage to plants by feeding on the sap within the leaves. These pests are particularly notorious for targeting indoor plants, where they can thrive in warm and dry environments.
THIS IS THE NEEM OIL WE USE TO TREAT THIS
Signs of Spider Mite Infestation: Identifying spider mite infestation early is crucial for preventing further damage to your Philodendron Paraiso Verde. Here are some signs to watch out for:
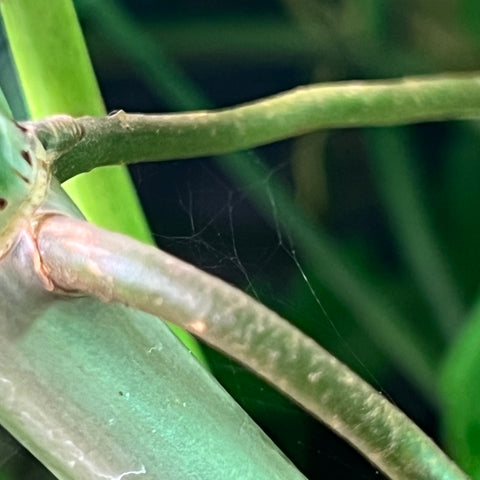
Fine Webbing: Spider mites often produce fine webbing on the undersides of leaves. This webbing may appear as thin strands and is a telltale sign of their presence.
Yellowing or Browning Leaves: As spider mites feed on the sap of the plant, they cause discoloration and damage to the leaves. You may notice yellowing, browning, or stippling on the foliage, indicating stress and decline.
Loss of Variegation: One of the most noticeable effects of spider mite infestation on Philodendron Paraiso Verde is the loss of variegation. The vibrant patterns on the leaves may fade, leaving behind a dull appearance.
Visible Pests: Although spider mites are tiny and difficult to spot with the naked eye, you may notice small specks moving on the leaves upon close inspection. These are the mites themselves, and their presence confirms an infestation.
(NOTICE THE SMALL SPECLES ON THE LEAF. THOSE ARE THE MARKS LEFT FROM SPIDER MITES)
Combatting Spider Mites and Restoring Variegation: To effectively address a spider mite infestation and restore the variegation of your Philodendron Paraiso Verde, follow these steps:
NEEM OIL: Neem that contains azadirachtin is the best way to treat spider mites!
Pruning: Trim away heavily infested leaves to reduce the mite population and prevent further damage.
Cleaning: Use a gentle stream of water or a damp cloth to wash the leaves thoroughly, removing any remaining spider mites and their webbing. Pay close attention to the undersides of leaves where the pests tend to congregate.
Natural Predators: Introducing natural predators such as ladybugs or predatory mites can help control spider mite populations in your indoor garden.
Chemical Treatments: As a last resort, consider using insecticidal soaps or miticides to target stubborn infestations. Be sure to follow the instructions carefully and avoid overuse to prevent harm to the plant.
Preventative Measures: To prevent future spider mite infestations and preserve the variegation of your Philodendron Paraiso Verde, maintain a healthy growing environment by:
Conclusion: The loss of variegation in your Philodendron Paraiso Verde can be disheartening, but understanding the underlying cause is the first step toward restoring its vibrancy. Spider mite infestations are a common issue faced by indoor plant enthusiasts, but with prompt action and diligent care, you can combat these pests and preserve the beauty of your beloved plant. By staying vigilant and implementing preventative measures, you can ensure that your Philodendron Paraiso Verde thrives for years to come, gracing your home with its striking variegated foliage.
the bottom sides of the leaves that show through the leaf.
Fungus gnats can be one of the most frustrating battles with house plants. Worry not though!
These organic methods are meant to be used simultaneously. You must fight gnats at all stages of life. There is no magic bullet! We're going to break each one down.
We call this combination the Gnat Fighting Kit, and it can be found Here.
You can get BTi Here.
You can get Gnat Sand Here.
You can get Sticky Traps Here.
Again, these Gnat Control items are best used in conjunction with one another!
Good luck! And remember these tips to limit gnats:
Fungus gnats are small, fly-like insects that can be a common pest in houseplants. They are attracted to moist soil and can multiply quickly, leading to infestations that can damage plants and be a nuisance. If you have noticed fungus gnats in your houseplants, there are several steps you can take to get rid of them.
The first step in getting rid of fungus gnats is to identify the source of the infestation. Fungus gnats typically lay their eggs in the soil of potted plants, so it is important to check the soil for any signs of eggs or larvae. Once you have identified the affected plants, you can take the following steps to eliminate the fungus gnats:
Allow the soil to dry out: Fungus gnats are attracted to moist soil, so one of the easiest ways to get rid of them is to allow the soil to dry out between watering. This will make the soil less attractive to the insects and help to kill off any eggs or larvae that are present.
Use a soil drench: There are several products available that can be used as a soil drench to kill off fungus gnats. These products typically contain chemicals that are toxic to the insects, and they can be applied directly to the soil. Follow the instructions on the product label carefully, as over-application can harm the plants.
Use yellow sticky traps: Yellow sticky traps can be an effective way to catch and kill adult fungus gnats. These traps are coated with a sticky substance that the insects get stuck to when they land on them. Place the traps near the plants that are infested with fungus gnats, and check them regularly to remove any trapped insects.
Repot the plants: If the infestation is severe, you may need to repot the affected plants to get rid of the fungus gnats. Carefully remove the plants from their pots, discarding any soil that is infested with eggs or larvae. Then, repot the plants using fresh, sterile potting soil.
By following these steps, you should be able to effectively get rid of fungus gnats in your houseplants and prevent future infestations. It is important to monitor the plants regularly and take action as soon as you notice any signs of an infestation, as this will help to minimize the damage to the plants and keep your home free of these pesky insects.
]]>
Plants, like all living organisms, require a variety of nutrients to survive and thrive. These nutrients can be divided into two categories: macronutrients and micronutrients. Macronutrients are nutrients that plants need in large quantities, including carbon, hydrogen, and oxygen, which are obtained from the air and water, and nitrogen, phosphorus, and potassium, which are obtained from the soil. Micronutrients, on the other hand, are nutrients that plants need in smaller quantities, including iron, zinc, and copper.
When plants are not getting enough of a particular nutrient, they can suffer from a deficiency. Nutrient deficiencies can manifest in a variety of ways, including yellowing or discoloration of the leaves, stunted growth, and poor fruit or flower production. Here are some of the most common nutrient deficiencies in plants:
Nitrogen deficiency: Nitrogen is an essential macronutrient that is necessary for the synthesis of proteins, enzymes, and other important biomolecules. Signs of nitrogen deficiency include yellowing or chlorosis of the leaves, stunted growth, and reduced fruit or flower production. Nitrogen deficiency is often more pronounced in the older, lower leaves of the plant.
Phosphorus deficiency: Phosphorus is another essential macronutrient that is necessary for the proper growth and development of plants. Signs of phosphorus deficiency include purple or reddish coloration of the leaves, stunted growth, and reduced fruit or flower production. Phosphorus deficiency is often more pronounced in cool, wet conditions.
Potassium deficiency: Potassium is a macronutrient that is necessary for the proper functioning of many plant processes, including photosynthesis and water balance. Signs of potassium deficiency include yellowing or mottling of the leaves, reduced fruit or flower production, and increased susceptibility to disease.
Iron deficiency: Iron is a micronutrient that is necessary for the synthesis of chlorophyll, the pigment that allows plants to photosynthesize. Signs of iron deficiency include yellowing or chlorosis of the leaves, especially between the veins, and stunted growth. Iron deficiency is often more pronounced in alkaline soils.
Magnesium deficiency: Magnesium is a micronutrient that is necessary for the synthesis of chlorophyll and the proper functioning of many plant processes. Some signs of magnesium deficiency include yellowing or chlorosis of the leaves, especially between the veins, and reduced growth. Magnesium deficiency is often more pronounced in the older, lower leaves of the plant, as magnesium is transported from these leaves to support new growth.
Zinc deficiency: Zinc is a micronutrient that is necessary for the proper growth and development of plants. It is involved in the synthesis of hormones and the regulation of gene expression. Zinc deficiency can cause yellowing or stunted growth, particularly in young plants.
By understanding the most common nutrient deficiencies that occur in plants, you can take steps to prevent or fix these problems and ensure that your plants are healthy and thriving.
]]>
Neem oil is a natural insecticide made from the seeds of the neem tree (Azadirachta indica). It is commonly used to control pests on a variety of plants, including vegetables, fruit trees, and ornamental plants. Neem oil works by disrupting the reproductive and feeding behavior of pests, making it effective at controlling a wide range of insects, including aphids, mites, whiteflies, and scale insects.
In addition to its insecticidal properties, neem oil can also be used to control fungal diseases and to improve the overall health and appearance of plants. It is often used as a natural alternative to synthetic pesticides and can be applied as a foliar spray or soil drench.
Neem oil is generally considered safe for use on plants and is not harmful to humans or pets. However, it can be toxic to fish and should not be used near bodies of water. It is also important to follow the label instructions and dilution rates when using neem oil to ensure the safety and effectiveness of the treatment.
]]>Root pruning is a gardening technique that involves cutting or removing roots from a plant to control its size or shape, or to stimulate new root growth. Whether or not you should root prune your plants will depend on the specific needs and characteristics of the plant, as well as your goals for the plant.
Here are a few reasons you might want to consider root pruning:
To control the size or shape of a plant: Root pruning can be used to reduce the size of a plant or to encourage it to grow in a particular shape. This can be especially useful for plants that have become too large for their container or have outgrown their space.
To stimulate new root growth: Root pruning can stimulate new root growth, which can be beneficial for plants that are experiencing root problems or that have become root-bound.
To prepare a plant for transplanting: Root pruning can be used to prepare a plant for transplanting by encouraging new root growth and making it easier to remove the plant from its current container.
Overall, root pruning can be a useful tool for controlling the size and shape of plants and for encouraging new root growth. However, it is important to be careful when root pruning, as it can be stressful for the plant and can lead to reduced growth or death if not done properly. It is always a good idea to research the specific needs and characteristics of your plant before root pruning.
]]>Aroids are a group of plants that belong to the Araceae family and include popular houseplants such as Philodendron, Monstera, and Pothos. These plants are known for their large, lush leaves and are generally easy to care for.
There are many different aroid mix recipes that you can use to grow your plants, and the best one for you will depend on your specific needs and preferences. Here is a simple recipe that you can use as a starting point:
Ingredients:
Instructions:
This mix should provide your aroids with the nutrients and moisture they need to grow and thrive. You can adjust the proportions of the ingredients to suit your specific needs and preferences. For example, you may want to add more perlite for improved drainage, or more compost for additional nutrients. Experiment with different ratios to find what works best for your plants.
]]>Soil is a naturally occurring, loose material that is composed of a mixture of organic matter, minerals, and other materials. It is the upper layer of the Earth's crust and is found in various parts of the world, from forests and grasslands to deserts and mountains.
Soil is an important component of the environment and plays a vital role in supporting plant growth and life. It provides plants with the nutrients, water, and support they need to grow and thrive, and it serves as a home for a diverse community of microorganisms and animals.
Soil is made up of a variety of materials, including organic matter (such as decomposed plant and animal matter), minerals (such as sand, silt, and clay), and water. The specific composition of soil depends on the climate, geology, and vegetation of the region where it is found.
Soil is a complex and dynamic system that is essential for the health of ecosystems and the well-being of people. It is important to manage soil responsibly and sustainably in order to preserve its valuable functions and protect the environment.
]]>Bacillus thuringiensis israelensis (Bti) is a type of bacteria that is commonly used as a natural pest control agent. It is found naturally in the environment and is used to control a variety of insect pests, including mosquitoes, blackflies, and gnats.
Bti produces proteins that are toxic to certain insects, but are generally safe for humans, animals, and the environment. When ingested by the target insects, the proteins bind to receptors in the gut and create pores that cause the insect's gut lining to break down, leading to death.
Bti is often used as a biological control agent in mosquito control programs, as it is effective at killing mosquito larvae while posing minimal risk to non-target organisms. It is also used to control other insect pests in a variety of settings, including gardens, greenhouses, and agricultural fields.
Bti is generally considered to be a safe and effective pest control option, but it is important to follow the manufacturer's instructions and use it according to label directions to ensure its safe and effective use.
]]>Misting your houseplants can be beneficial in certain circumstances, but it is not necessary for all plants or all situations. Here are a few things to consider when deciding whether or not to mist your plants:
The plant's specific needs: Some plants, such as tropical or rainforest species, prefer high humidity and may benefit from regular misting. Other plants, such as succulents or cacti, prefer lower humidity and may be sensitive to excess moisture. Be sure to research the specific needs of your plants and provide them with the appropriate level of humidity.
The plant's location: The humidity in your home can vary depending on the location of the plant and the time of year. For example, plants in a sunny, south-facing window may need more misting than plants in a cooler, shadier location.
The plant's potting mix: The type of potting mix you use can also affect the need for misting. Soil-based mixes tend to retain more moisture than soilless mixes, which may mean that plants grown in soil-based mixes need less misting.
Overall, misting can be a useful tool for providing plants with the appropriate level of humidity, but it is important to pay attention to the specific needs of each plant and to use misting judiciously to avoid over-watering or creating too much moisture.
]]>Tissue culture, also known as micropropagation, is a laboratory technique used to grow and propagate plants from small tissue samples. It involves the use of specialized equipment and procedures to create a sterile, controlled environment in which plant cells can be grown and multiplied.
Tissue culture is commonly used to propagate a wide range of plants, including annuals, perennials, trees, and shrubs. It is often used to produce plants that are true-to-type, meaning that they are genetically identical to the parent plant. This can be especially useful for producing plants with specific traits or characteristics, such as disease resistance or variegation.
To perform tissue culture, small tissue samples are taken from the parent plant and placed on a nutrient-rich medium, such as agar or gel, in a sterile container. The tissue samples are then placed in a growth chamber or incubator that provides the appropriate temperature, light, and humidity conditions for the plants to grow and multiply.
Tissue culture can be a complex and time-consuming process, but it offers several advantages, including the ability to produce a large number of plants in a short amount of time and the ability to propagate plants that are difficult to grow or propagate using traditional methods. It is also a useful tool for preserving rare or endangered plant species, as it allows for the production of plants without the need to collect additional specimens from the wild.
]]>Bright, indirect light refers to a type of light that is bright and provides plenty of illumination, but is not directly in the path of the sun's rays. This type of light is commonly found near windows that receive plenty of natural light, but are not directly exposed to the sun.
Bright, indirect light is generally considered to be a good lighting condition for a wide range of houseplants, as it provides the plants with the light they need to photosynthesize and grow, without being too intense or direct.
To determine if a particular location in your home receives bright, indirect light, you can perform a simple test by holding your hand up to the light and seeing if you can see your shadow. If you can see your shadow clearly, the light is too direct and may not be suitable for most houseplants. If you can see your shadow, but it is faint or indistinct, the light is likely to be bright, indirect light, which is suitable for many houseplants.
It is important to keep in mind that the specific light requirements of different plants can vary, so it is a good idea to research the specific needs of your plants and provide them with the appropriate lighting conditions. Overall, bright, indirect light is a great choice for many houseplants and can help them thrive and grow to their full potential.
]]>Yellowing leaves on a plant can be caused by a variety of factors, including improper watering, nutrient deficiencies, pests, or environmental stress. Here are some common causes of yellowing leaves on plants and what you can do to address them:
Over-watering: One of the most common causes of yellowing leaves is over-watering, which can cause the roots to rot and prevent the plant from absorbing water and nutrients. To fix this problem, reduce the frequency of watering and make sure the soil is well-draining to allow excess water to drain away.
Under-watering: On the other hand, under-watering can also cause yellowing leaves, as the plant becomes dehydrated and unable to absorb enough water and nutrients. To fix this problem, increase the frequency of watering and make sure the soil is evenly moist, but not waterlogged.
Nutrient deficiencies: Yellowing leaves can also be caused by a lack of nutrients in the soil. This can be caused by poor soil quality, insufficient fertilization, or a lack of specific nutrients that the plant needs to grow. To fix this problem, fertilize the plant according to the specific needs of the plant and consider using a soil test kit to check the nutrient levels in the soil.
Pests: Pests such as aphids or spider mites
Spider plants (Chlorophytum comosum) are popular houseplants that are known for their long, thin leaves and their ability to thrive in a variety of conditions. With proper care, spider plants can grow into a beautiful and low-maintenance addition to your home.
Here are some tips for caring for spider plants:
Provide bright, indirect light: Spider plants prefer bright, indirect light, which can be provided by placing the plant near a window that receives plenty of light without being in direct sunlight. Avoid placing the plant in a location that receives hot, direct sunlight, as this can cause the leaves to yellow or scorch.
Keep the soil moist: Spider plants prefer well-draining soil that is kept evenly moist, but not waterlogged. Water the plant when the top inch or so of soil feels dry to the touch, and be sure to use a pot with proper drainage to prevent the soil from staying too moist.
Fertilize regularly: Spider plants benefit from regular fertilization, especially during the growing season. Use a balanced, slow-release fertilizer according to the instructions on the product label, and be sure to dilute the solution to half strength to avoid over-fertilizing.
Prune regularly: Spider plants benefit from regular pruning to maintain their shape and encourage new growth. Use clean, sharp scissors to remove any dead or damaged leaves, as well as any branches that are crossing or rubbing against each other.
By following these care tips, you can help your spider plant thrive and grow into a healthy and attractive addition to your home.
]]>Pothos, also known as the Devil's Ivy, is a popular houseplant that is known for its long, trailing vines and its ability to thrive in a variety of conditions. With proper care, pothos can grow into a beautiful and low-maintenance addition to your home.
Here are some tips for caring for pothos:
Provide bright, indirect light: Pothos prefer bright, indirect light, which can be provided by placing the plant near a window that receives plenty of light without being in direct sunlight. Avoid placing the plant in a location that receives hot, direct sunlight, as this can cause the leaves to yellow or scorch.
Keep the soil moist: Pothos prefer well-draining soil that is kept evenly moist, but not waterlogged. Water the plant when the top inch or so of soil feels dry to the touch, and be sure to use a pot with proper drainage to prevent the soil from staying too moist.
Fertilize regularly: Pothos benefit from regular fertilization, especially during the growing season. Use a balanced, slow-release fertilizer according to the instructions on the product label, and be sure to dilute the solution to half strength to avoid over-fertilizing.
Prune regularly: Pothos benefit from regular pruning to maintain their shape and encourage new growth. Use clean, sharp scissors to remove any dead or damaged leaves, as well as any branches that are crossing or rubbing against each other.
By following these care tips, you can help your pothos thrive and grow into a healthy and attractive addition to your home.
]]>Fiddle leaf fig trees, or Ficus lyrata, are popular houseplants that are known for their large, glossy, fiddle-shaped leaves and their ability to thrive in a variety of conditions. With proper care, fiddle leaf fig trees can grow into a stunning and graceful addition to any indoor space.
Here are some tips for caring for a fiddle leaf fig tree:
Provide bright, indirect light: Fiddle leaf fig trees prefer bright, indirect light, which can be provided by placing the plant near a window that receives plenty of light without being in direct sunlight. Avoid placing the plant in a location that receives hot, direct sunlight, as this can cause the leaves to yellow or scorch.
Keep the soil moist: Fiddle leaf fig trees prefer moist, well-draining soil, but it is important to avoid over-watering or letting the soil dry out completely. Water the plant when the top inch or so of soil feels dry to the touch, and be sure to use a pot with proper drainage to prevent the soil from staying too moist.
Fertilize regularly: Fiddle leaf fig trees benefit from regular fertilization, especially during the growing season. Use a balanced, slow-release fertilizer according to the instructions on the product label, and be sure to dilute the solution to half strength to avoid over-fertilizing.
Prune regularly: Fiddle leaf fig trees benefit from regular pruning to maintain their shape and encourage new growth. Use clean, sharp scissors to remove any dead or damaged leaves, as well as any branches that are crossing or rubbing against each other.
By following these care tips, you can help your fiddle leaf fig tree thrive and grow into a healthy and attractive addition to your home.
]]>Variegated plants are plants that have leaves or other parts of their foliage that are marked with different colors or patterns. This can be caused by a genetic mutation that results in the plant producing pigments in an uneven or irregular pattern, resulting in the plant having multiple colors in its foliage.
Variegated plants are prized for their unique, attractive appearance and are often sought after by plant collectors and gardeners. They can add visual interest to a garden or indoor space and can be used to create striking contrast or to complement other plants in a landscape or container garden.
There are many different types of variegated plants, including annuals, perennials, trees, shrubs, and houseplants. Some common examples of variegated plants include the variegated corn plant (Dracaena fragrans 'Variegata'), the variegated snake plant (Sansevieria trifasciata 'Laurentii'), and the variegated agave (Agave americana 'Marginata').
It is important to keep in mind that variegated plants can be more sensitive to light and moisture than their solid-colored counterparts, and they may require more careful care and attention to thrive. In general, it is a good idea to provide variegated plants with bright, indirect light and to avoid over-watering or letting the soil dry out completely. By providing the right care, you can help your variegated plants thrive and enjoy their unique, eye-catching appearance.
]]>The best light for houseplants depends on the specific needs of the plant. Different plants have different light requirements, and providing the right amount and type of light is essential for their health and growth.
In general, most houseplants prefer bright, indirect light, which means they need access to plenty of light without being directly in the path of the sun's rays. This can be provided by placing the plants near a window that receives bright, indirect light, or by using a grow light or artificial light source.
Some plants, such as succulents and cacti, can tolerate and even thrive in direct sunlight, while others, such as ferns and African violets, prefer lower light conditions. It is important to research the specific light requirements of your houseplants and provide them with the appropriate amount of light for their needs.
In addition to the intensity of the light, the quality of the light is also important. Natural light tends to be more balanced and full-spectrum, providing the right mix of wavelengths for plant growth. Artificial light sources, such as grow lights, can be used to supplement natural light or provide light for plants that are not able to grow in a particular location, but they may not provide the same spectrum of light as the sun.
Overall, the best light for houseplants is bright, indirect light that provides the right intensity and spectrum of light for the specific needs of the plant. By providing your plants with the right light conditions, you can help them thrive and grow to their full potential.
]]>Snake plants, also known as Sansevieria or mother-in-law's tongue, are popular houseplants that are known for their tough, drought-resistant nature and their ability to thrive in a variety of conditions. They are also easy to propagate, making them a great choice for plant lovers who want to increase their collection or share plants with friends.
There are several methods you can use to propagate snake plants, including:
Division: Snake plants can be propagated by dividing the offsets or "pups" that grow from the base of the plant. To do this, carefully remove the offsets from the mother plant, making sure to keep as many roots as possible. Plant the offsets in their own pots, using a well-draining soil mix.
Leaf cuttings: Snake plants can also be propagated by rooting leaf cuttings. To do this, cut a healthy leaf from the plant and remove the lower inch or so of the leaf. Place the cutting in a well-draining soil mix and water it regularly to keep the soil moist. The cutting should root within a few weeks and can be transplanted into a separate pot when it is well-established.
Root cuttings: Another option for propagating snake plants is to take root cuttings. To do this, carefully dig up the plant and cut off a small section of the roots. Plant the root cutting in a well-draining soil mix and water it regularly to keep the soil moist. The root cutting should produce new growth within a few weeks and can be transplanted into a separate pot when it is well-established.
Regardless of the method you choose, it is important to keep the soil moist and provide the propagated plants with bright, indirect light until they are well-established. With proper care, your snake plant propagations should thrive and grow into healthy, robust plants.
]]>Root rot is a common problem that can affect a variety of plants, and it is caused by a number of fungi that thrive in moist, poorly-draining soil. If left untreated, root rot can be lethal to plants, as the infected roots are unable to absorb water and nutrients from the soil.
If you suspect that your plant may be suffering from root rot, there are several steps you can take to try to cure it:
Remove the plant from its pot and examine the roots: The first step in curing root rot is to identify the extent of the damage. Gently remove the plant from its pot and examine the roots. Healthy roots will be white or pale in color and firm to the touch, while infected roots will be dark, soft, and slimy. Prune away any infected roots, being careful not to damage any healthy ones.
Repot the plant in fresh, sterile soil: Once you have removed the infected roots, repot the plant in fresh, sterile soil. Be sure to use a pot with proper drainage to prevent the soil from staying too moist.
Improve the drainage of the soil: Improving the drainage of the soil can help to prevent future root rot problems. This can be done by adding perlite or sand to the soil mix to improve aeration, or by using a pot with proper drainage holes to allow excess water to drain away.
Provide the plant with proper care: Proper care is essential in preventing root rot. Water the plant only when the soil is dry to the touch, and avoid over-watering or letting the soil stay too moist. Provide the plant with adequate light and fertilize it according to the specific needs of the plant.
While it is not always possible to save a plant that is severely infected with root rot, following these steps can help to improve the chances of survival and prevent future root rot problems. If the plant is not showing signs of recovery after a few weeks, it may be necessary to consider replacing it.
]]>LECA, or Lightweight Expanded Clay Aggregate, is a type of porous, granular material that is made from clay that has been fired at high temperatures. It is commonly used as a soil-less growing medium in hydroponic systems, as well as in landscaping and construction projects.
One of the main benefits of LECA is its ability to hold water and air, making it an ideal growing medium for plants that require moist conditions. It is also lightweight and easy to work with, making it a popular choice for use in container gardens and other portable growing systems.
LECA is made by pelletizing clay and then firing it in a rotary kiln at high temperatures. This process causes the clay to expand and form small, porous balls that are lightweight and have a high surface area. The resulting material is then sieved to create different size grades, depending on the intended use.
LECA is widely available and can be purchased in different sizes and quantities from a variety of sources, including garden centers, hydroponic stores, and online retailers. It is generally considered a sustainable and eco-friendly growing medium, as it is made from a natural resource and can be recycled or reused.
]]>Spider mites are tiny, spider-like pests that can infest a variety of plants, including houseplants, vegetables, and fruit trees. They feed on the sap of plants and can cause damage by sucking the nutrients from the leaves, causing yellowing, mottling, and eventually death of the plant. If you have noticed spider mites on your plants, there are several steps you can take to get rid of them:
Remove affected leaves: If the infestation is not too severe, you can try removing the affected leaves from the plant. This will remove some of the mites and may help to slow down the spread of the infestation.
Use a strong spray of water: Spider mites are sensitive to moisture, and a strong spray of water can help to dislodge them from the plant. Use a garden hose or a watering can to thoroughly drench the plant, making sure to hit the undersides of the leaves where the mites tend to hide.
Use a natural pest control method: There are several natural pest control methods that can be effective in getting rid of spider mites. For example, you can try using neem oil, which is a natural insecticide that is safe for use on plants. You can also try using a solution of soap and water, which can help to kill the mites on contact.
Use a chemical insecticide: If the infestation is severe and the above methods are not effective, you may need to use a chemical insecticide. There are several products available that are specifically formulated to kill spider mites. Follow the instructions on the product label carefully, as over-application can harm the plants.
It is important to monitor your plants regularly and take action as soon as you notice any signs of an infestation, as this will help to minimize the damage to the plants and prevent the infestation from spreading to other plants.
]]>
All versions of the Variegated Monstera (Monstera variegata) come from the Genus of Monstera. And they either come from the species borsigiana OR deliciosa. To be Variegated Monstera, there must be albino portions of the leaf.
WHITE VARIEGATION
PRICE : [ $ $ $ ]
Albo Monstera is the Classical Variegated Monstera (aka Monstera Variegata). When you hear someone say, 'Albo' they are referring to this one!
It can have different patterns such as Marbled, Sectoral, or Sport.
Marbled variegation is a blend of white and green parts which makes for one of the most sought after colorings!
Discrete lines through the leaves leads to sections being completely white, or completely green.
Variegation in Albos can decrease with subsequent leaves beyond the stem. We call this 'Sport' variegation when an Albino plant begins putting out mostly green leaves with low variegation.
CREAM YELLOW VARIEGATION
PRICE : [ $ $ $ $ ]
As the name implies, the Thai Constellation looks like a meteor show across the leaves! It tends to have a pattern of splashes of yellow across its green leaves.
Like the Marbled Monstera Albo, The Thai, can have half mooning and large patches of yellow variegation.
YELLOW VARIEGATION
PRICE : [ $ $ $ $ $ ]
Monstera Aurea has YELLOW coloring throughout its leaves. The Aurea typically has marbling, as well as a half mooning that can occur.
The stem of each plant contains the genetics of the plant. If you are wondering what the leaves will look like, Look at the Stem!
Use your blinds for a simple way to understand houseplant light: BRIGHT indirect Light, MEDIUM indirect Light, and LOW indirect Light.
Though most Fiddle Leaf Fig Tree parents tend to overwater their plants (keep the soil waterlogged), and give it too little light, this condition is from drought-like conditions, usually coupled with increased light levels.
Fiddle Leaf Figs need evenly moist soil through the Growing Season(March-September). When the plant doesn't have enough access to moisture in the root zone, a condition occurs that affects Ficus lyrata's newest growth.
Reddish, brown spots are created on the bottom sides of the leaves that show through the leaf.
According to the University of Florida Excessive Moisture Stress (which sounds like too much moisture, but is not) is the driver of this condition.
That means the plant is exposed to irregular watering patterns. This also typically occurs in combination with higher light levels.
This creates the perfect storm to expose the irregular watering patterns. Because light and water go hand-in-hand in consumption during photosynthesis, the more light a plant is exposed to the more water it will need. You can learn more about that relationship here.
Lack of water in the root zone makes it challenging for plants to absorb necessary minerals from the soil. Make sure to keep your Fiddle Leaf Fig Tree (Ficus lyrata) soil evenly moist through the growing season, and allow it to dry out slightly more in the fall and winter.
And be sure to give it bright, but indirect light! That is explained here in a 1-minute video.
Mix 2 parts water, 1 part hydrogen peroxide, soak your soil with this mixture.
Mix 6-10 drops bleach per 1 quart of water, then soil drench with this solution!
The video below shows both methods in action!
Root rot occurs when the roots don’t receive enough oxygen, usually because of too much water.
A parasite called Pythium makes its way in, and needs to be sterilized from the soil! Use peroxide or bleach to do this!
Eventually, yes with the treatments outlined above!
Think of the sterilization (Peroxide + Bleach) as antibiotics.
We have to wipe out the bad in our soil, to allow new microbes in and protect our plants!
Hydrogen Peroxide on Amazon, here.
Bleach on Amazon, here.
]]>
One of the most frequent questions we get is: How much should I water my plants?
All houseplants should not be watered exactly the same.
Broadly, they can be broken into 3 categories
The more light a plant consumes, the more water it needs. For example, this Pink Princess Philodendron and Lilies are getting tons of light.
That means they need lots of water.
The number one issue we see in plant care is overwatering.
Light sets a plant's growth. It determines everything else. It sets how fast of a car we're driving. Is it a Ferrari, or is it a Ford Pinto?
The more light we have, the more water we can consume, the more CO2 we can turn to oxygen.
Water consumption is driven by the amount of light.
Because light and water go hand-in-hand in consumption during photosynthesis, the more light a plant is exposed to the more water it will need.
Now, don't run off after seeing this next diagram (this isn't a 7th grade science lesson).
The photosynthesis diagram simply shows light being absorbed, which kicks off a process that helps the plant grow.
But it all begins with LIGHT!
Understanding this should allow you to care better for your plant. Are you wondering how much to water? Consider how much light your space has to provide.
If it's dark, don't water much. If it's bright, water more! Here's a video on that.
For simplicity, we've broken light levels into 3 sections:
BRIGHT INDIRECT: all houseplants can thrive in this light, but it is prime real estate 🏡 Save it for your plants that must have it to thrive! Figs, monsteras...
MEDIUM INDIRECT: often a few feet from windows, in the middle of rooms. Most houses have lots of this space 💡 Pothos, Philodendrons...
LOW INDIRECT: often on the opposite wall of a window. Can get dark for many hours of the day. ☁️Snakes, ZZs...
Think of light as the minimum amount required! If a plant is graded as medium indirect, it’s best to not go much below that level 😄